

4 Types of Self-Billed e-invoices
In Malaysia, self-billed e-invoices are a way for buyers or payers to issue invoices on behalf of their suppliers in specific situations. There are four main types of self-billed e-invoices, each used under different circumstances. Below is an overview of each type, extracted and summarized from CK Tan & Co.
1. Self-Billed Invoice
A Self-Billed Invoice is issued by the buyer or the party responsible for payment when specific conditions are met. This type of invoice is the most basic and is used in situations where the buyer or payer takes responsibility for invoicing the transaction. It’s commonly applied in instances where the supplier has authorized the buyer to issue invoices on their behalf.
2. Self-Billed Credit Note (CN)
A Self-Billed Credit Note is required when there are instances of returns, cancellations, or discounts on purchased products or services. The credit note is used to reduce the amount originally stated in the self-billed invoice. This adjustment reflects a decrease in the total sales amount due to these changes in the transaction.
3. Self-Billed Debit Note (DN)
A Self-Billed Debit Note is used when there are additional charges or requirements such as installation, shipping, or customization services. The debit note serves to increase the original amount stated in the self-billed invoice to account for these extra services or charges.
4. Self-Billed Refund Note (RN)
Similar to the self-billed credit note, a Self-Billed Refund Note is issued when there are refunds, returns, or cancellations. However, this type specifically deals with scenarios where refunds are issued back to the buyer. The self-billed refund note records the refund and reduces the original sales amount accordingly.
Important Note
All four types of self-billed documents are the responsibility of the buyer or payer. They must be issued under the buyer’s account and submitted for validation to the LHDN (Inland Revenue Board of Malaysia). This process ensures compliance with Malaysian tax regulations and maintains accurate records for all parties involved.
How to Issue Self-Billed e-invoice Using MyInvois Portal
Issuing a self-billed e-invoice can be a complex process, but with the MyInvois portal, the procedure is streamlined and user-friendly. This guide will walk you through the steps involved in issuing a self-billed e-invoice, ensuring you navigate the portal efficiently and complete the necessary tasks without hassle. Whether you are new to MyInvois or looking for a refresher, follow the steps below for a smooth invoicing experience.
Step 1: Access the MyInvois Portal

To begin, access the MyInvois portal by visiting the following link: https://preprod-mytax.hasil.gov.my/
Note that this portal is currently open for testing purposes. It allows users to familiarize themselves with the invoicing system and practice issuing invoices without any risks.
Step 2: Log In to Your Account
Once you are on the MyInvois portal, you will need to log in:

- Enter your Identification Card Number and Password in the login fields.

- Click Submit to access your account.
Step 3: Choose the MyInvois Portal (Preprod Environment)

After logging in, you will need to select the correct environment:
- Click on MyInvois in the top navigation menu.
- Choose preprod under the MyInvois options. This will ensure you are using the testing environment.
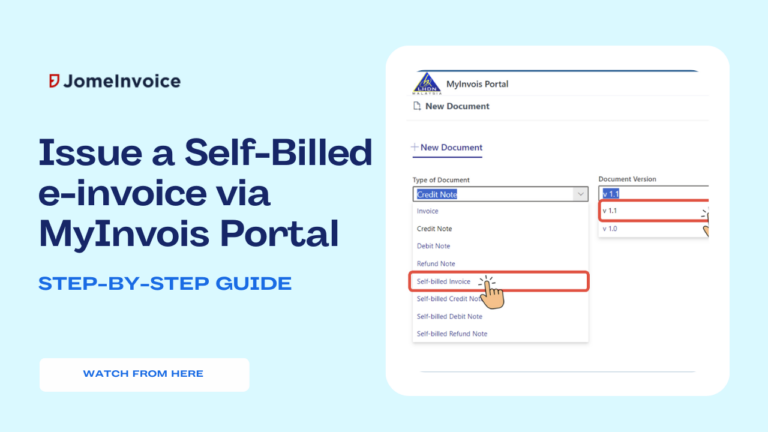
Step 4: Select the Document Type and Version
To create a new self-billed invoice:

- Go to the Documents section and click on New Document.

- From the dropdown menu, select Self-Billed Invoice.

- Ensure you choose the document version v1.1 to align with the latest system standards.
Step 5: Add Basic Information
In this step, you will need to fill out the basic information for the invoice:

- The system will auto-generate the Invoice Number and Date/Time. You can override these fields if needed, but it is generally recommended to use the auto-generated data for accuracy.

- Click Continue to proceed.
Step 6: Add Buyer and Supplier Details
Inputting the details of the buyer and supplier is essential:

- Enter the information for both the supplier and buyer, including Tax Identification Numbers (TIN) and other relevant details.

- The buyer’s details will be automatically generated upon validation. Ensure accuracy by clicking Validate and then proceed by clicking Continue.
Step 7: Confirm Currency
The next step involves confirming the currency to be used for the transaction:

- Choose the appropriate currency (e.g., Malaysian Ringgit) from the dropdown menu.

- Click Add Line to begin adding items to your invoice.
Step 8: Add Line Items
Here, you will specify the details of the items included in the invoice:

- Fill in the fields for Classification Codes, Product or Service, Product Tariff Code, Quantity, and Unit Price.

- Click Add to save the line item. Repeat this step if there are multiple items to include.
Step 9: Add Tax Details
Incorporate the necessary tax information:

- Click Add Tax and select the appropriate Tax Type (e.g., Sales Tax, Service Tax, etc.).

- Enter details such as the Amount Exempted from Tax and Tax Exemption Reason if applicable.

- Click Add to save. If you need to add additional tax items, click Add & New.
Step 10: Confirm the Line Items Added
Review the line items you’ve entered:

- Verify that all the details are accurate, including product/service descriptions, quantities, and prices.
- Once confirmed, click Continue to proceed.
Step 11: Add Additional Information (Part 1)
This section focuses on adding extra billing and payment details:

- Fill in Frequency of Billing Information, including the billing period start and end dates.

- Provide Payment Terms, Payment Method, Supplier Bank Account Number, and any pre-payment information such as Pre-Payment Date and Reference Number.
- Ensure all the information is accurate before moving on by clicking Continue.
Step 12: Add Additional Information (Part 2)
In the next part, you need to add shipping and import/export details:

- Fill out the Shipping Information, including the recipient’s name, address, postal code, and other relevant details.

- Add Import & Export Information, such as Custom Form Numbers, Authorization Numbers, and other related data for the shipment.

- Once all information is entered, click Continue.
Step 13: Review All Details
Before finalizing the invoice, review all the details summarized in this step:

- Confirm that all information entered, such as supplier and buyer details, line items, and additional data, is correct.

- Click Sign & Submit Document to move forward if everything is accurate.
Step 14: Self-Billed e-invoice Document Signing
For security and verification, you must sign the document:

- Re-enter your Identification Card Number and Password.
- Tick the checkbox to acknowledge compliance with the regulations set by the Inland Revenue Board (IRB).
- Click Submit to sign the document officially.
Step 15: Submit the Document
After signing, the portal will display a confirmation message:

- The message confirms that your document has been successfully submitted and is pending verification.

- The document will appear in your Documents List shortly. Click Finished to complete the process.
Self-Billed e-invoice Made Easy Today!
Issuing a self-billed e-invoice via the MyInvois portal is a structured and straightforward process when the steps are followed systematically. Whether for practice in the testing environment or actual invoicing, ensuring each step is completed accurately will help you maintain compliance and streamline your invoicing tasks. If you encounter any issues, refer to the MyInvois user manual or reach out to their support team for further assistance.
This guide should make the process easy to follow and help you get started efficiently with MyInvois Portal!
JomeInvoice: Best e-invoicing Software Malaysia Trusted by Over 60+ major companies in Phase 1

JomeInvoice: Best e-invoicing Software Malaysia
As Malaysia transitions into mandatory e-invoicing, businesses are on the lookout for the best e-invoicing software solutions to stay compliant with LHDN’s regulations. In addition to mastering the MyInvois Portal, it’s crucial to have an e-invoicing software Malaysia that can simplify this process. This is where JomeInvoice stands out as one of the Top 3 middleware e-invoicing platforms in Malaysia.
Why JomeInvoice is the Best e-invoicing Software Solution for SMEs and Large Enterprise Malaysia:
JomeInvoice stands out as the most user-friendly and comprehensive e-invoicing software solution, offering the perfect balance of flexibility, compliance, and support for both SMEs and large enterprise Malaysia. Whether you are transitioning into the LHDN e-invoice mandate or looking to streamline your current invoicing process, JomeInvoice provides everything you need—from free trials to ongoing updates and local support.
- Flexible System Compatibility
JomeInvoice offers seamless integration with popular systems such as SAP ECC6, S4 Hana, Sage300, MS365, Netsuite, Odoo, Xero & etc. This flexibility makes it ideal for businesses of all sizes—whether you’re an SME or a large enterprise Malaysia, JomeInvoice adapts to your current operations without a hitch. - Full Compliance with LHDN e-invoice Platform Regulations
Compliance is key, and JomeInvoice ensures that your business meets all LHDN e-invoice guidelines. ISO-certified and fully PDPA-compliant, JomeInvoice offers a secure, worry-free invoicing process that keeps you aligned with Malaysia’s regulatory standards. - Trusted by Leading Businesses
Over 60+ major companies, including those in Phase 1 of e-invoicing Malaysia compliance, rely on JomeInvoice for their invoicing needs. The platform is proven to handle large-scale, complex transactions seamlessly, making it a trusted choice across industries. - Free Upgrades, Training, and Dedicated Support
JomeInvoice keeps your business up to date with automatic upgrades that maintain LHDN compliance. Plus, free training and access to a dedicated Malaysian support team ensure your staff can easily adapt to the platform. With cloud server capabilities, you’ll also benefit from secure, flexible invoicing solutions. - Backed by a Listed Company
JomeInvoice is not just reliable but also backed by a publicly listed company on Bursa Malaysia. This adds an extra layer of trust and assurance for businesses looking to invest in long-term solutions.
Ready to streamline your e-invoicing Malaysia processes?
Contact JomeInvoice today and take advantage of the best e-invoice software features! Our dedicated team is ready to help your business stay ahead with compliance and efficiency.
Contact JomeInvoice Sdn Bhd:
- Address:
Level 38, MYEG Tower, Empire City Damansara, Jalan PJU 8, Damansara Perdana, 47820 Petaling Jaya, Selangor
D-04-07, Plaza Bukit Jalil (Aurora Place), No. 1, Persiaran Jalil 1, Bandar Bukit Jalil, 57000 Kuala Lumpur - Phone: +6016-732 0163
- Social Media:
LinkedIn | Facebook
Don’t wait—schedule a free consultation today and see why JomeInvoice is the top choice for businesses nationwide!